Create a Rivet component using utilities
Learn how to use Rivet's utility classes to create your own component
What you'll learn
- How to read utilities documentation
- How to use utilities to add Rivet styles to non-component markup
- How to combine utilities to create new components
What are Rivet utilities? #
Rivet utilities are CSS classes that can be used to adjust color, spacing, typography, borders, shadows, and other visual styles.
Utilities are helpful when you need to fine-tune a page layout. You can also combine utilities to create an interface element that Rivet’s built-in components don’t cover.
In this tutorial, you’ll use Rivet utilities to create the author byline component shown below.
 The author byline component you'll create in this tutorial.
1. Open CodePen #
Go to codepen.io/pen.
This will open CodePen, an in-browser editor in which you can write HTML, CSS, and JavaScript.
2. Set up your CodePen workspace #
The CodePen editor has three tabs: HTML, CSS, and JS. In this tutorial, you’ll only be using the HTML tab.
First, click the Change View button at the top of the editor and select the left-aligned layout. This will move the code editing tabs to the left side of the screen.
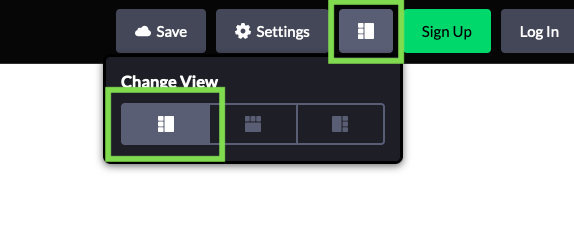
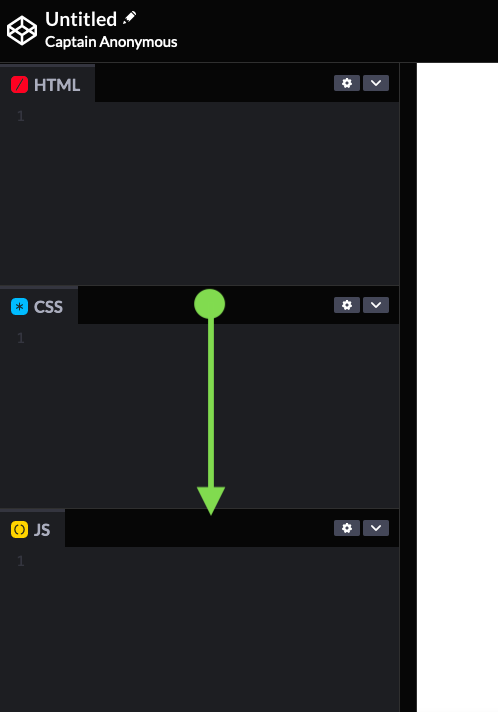
To hide the CSS and JS tabs and make the HTML editor tab larger, click the CSS tab header and drag it down to the bottom of the screen.
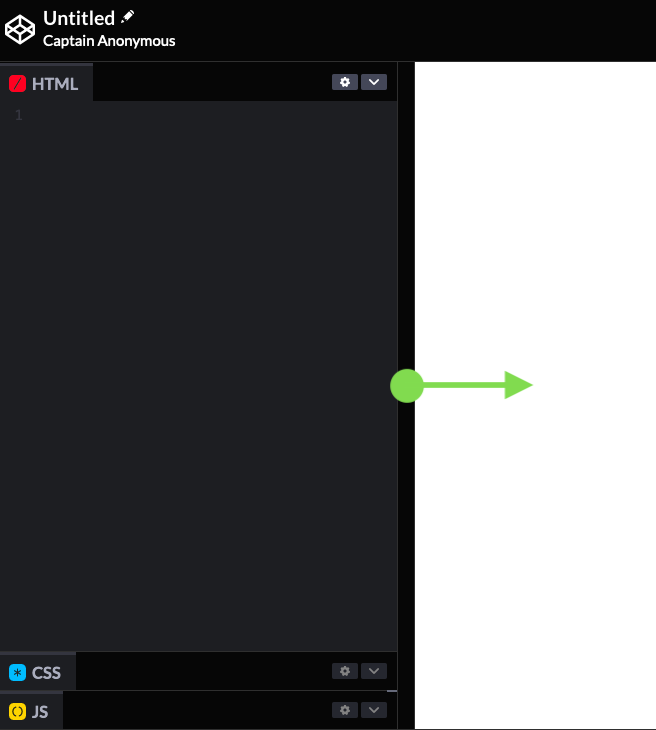
Depending on your screen size, you may also want to make the HTML editor tab wider. You can do so by clicking and dragging the divider between the code editor tabs and preview area.
3. Import Rivet CSS #
CodePen allows you to import CSS stylesheets into your document.
To include Rivet styles and utilities, click the Settings button at the top of the editor. This will open a configuration screen.
In the screen that opens, click CSS in the left-hand menu.
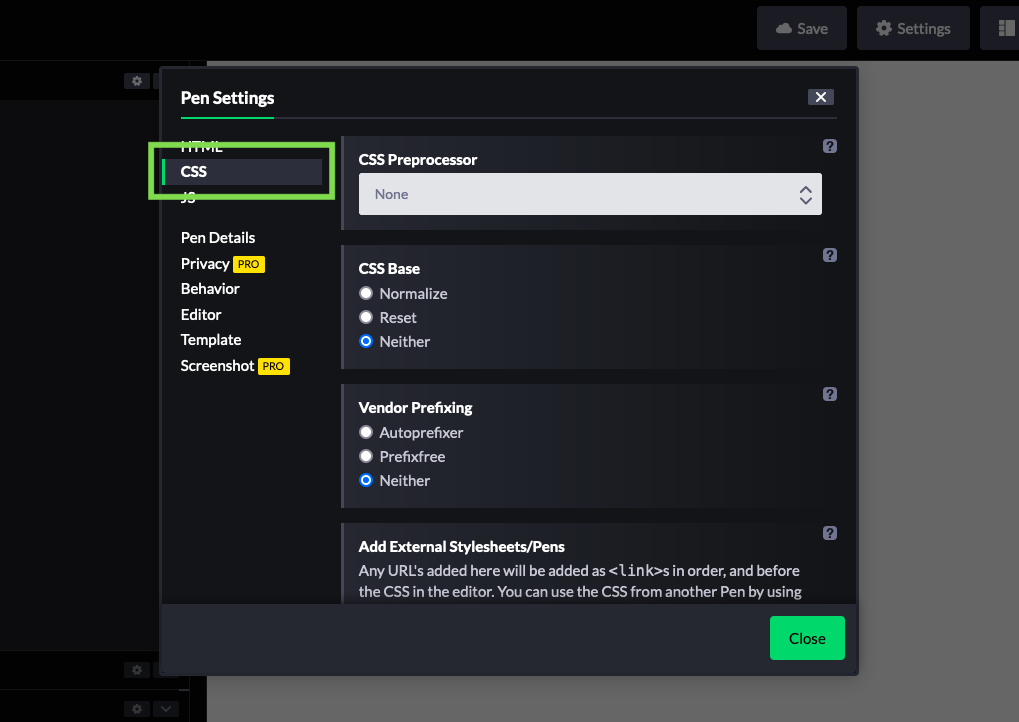
Scroll down to Add External Stylesheets/Pens. Paste the following into the first text field (not the search box):
https://unpkg.com/rivet-core@2.6.0/css/rivet.min.css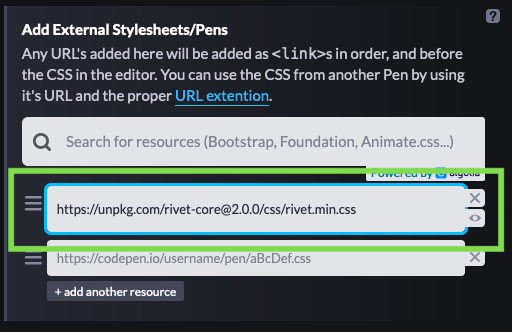
Click Close.
4. Copy and paste byline markup #
Copy the byline component markup shown below and paste it into the HTML tab in CodePen.
You should see the unstyled byline component appear in the preview window.
<!-- Component wrapper -->
<div>
  <!-- Image -->
  <img src="https://rivet.iu.edu/img/placeholder/avatar-1.webp" alt="">
  <!-- Content -->
  <div>
    <h2>Norval Ashton</h2>
    <p>Norval Ashton is a writer and researcher from Bloomington, Indiana. They have won many awards.</p>
    <a>test@iu.edu</a>
  </div>
</div>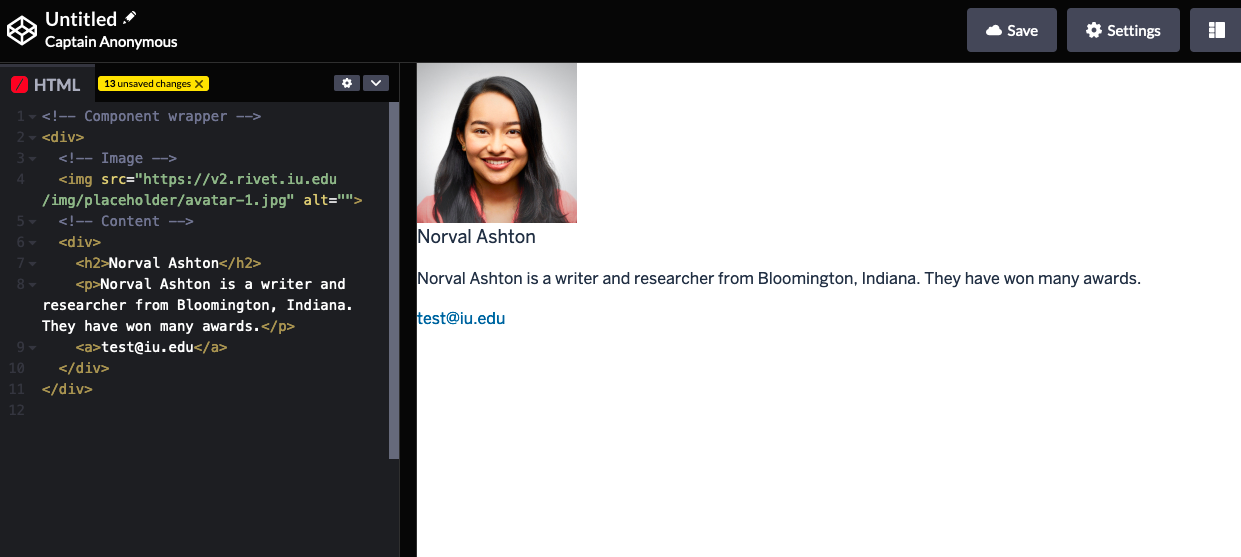
Note that the pasted markup is just basic HTML. In the next steps, you’ll use utility classes to add Rivet styles to the byline component.
5. Move text to the right of the photo #
Currently, the author’s name, bio, and email are positioned underneath the photo.
To move them to the right of the photo, you’ll use Rivet’s flex utilities. Flex utilities allow you to fine-tune the position of elements within a single component.
Go to the flex utilities documentation.
Reading utilities documentation #
A utilities documentation page has the following sections:
- Overview
- A short description of the utility classes and the use cases they're designed for.
- Examples
- A dropdown that lets you preview different examples of the utilities in use and their associated HTML code. You can use the buttons in this section to open the preview in a new window, edit the code on CodePen, copy the code to your clipboard, or grab a shareable link directly to the example.
- Usage
- Instructions on how to use the utility classes.
5.1. Arrange content horizontally #
You can arrange items horizontally in an element by using the .rvt-flex utility class.
Add the .rvt-flex CSS class to the component wrapper div in the byline markup as shown below.
The page preview should update to show the text moved to the right of the photo.
<!-- Component wrapper -->
<div class="rvt-flex">
  <!-- Image -->
  <img src="https://rivet.iu.edu/img/placeholder/avatar-1.webp" alt="">
  <!-- Content -->
  <div>
    <h2>Norval Ashton</h2>
    <p>Norval Ashton is a writer and researcher from Bloomington, Indiana. They have won many awards.</p>
    <a>test@iu.edu</a>
  </div>
</div>
5.2. Center content vertically #
You can center items vertically in an element by using the .rvt-items-center utility class in combination with .rvt-flex.
Add the .rvt-items-center CSS class to the component wrapper div in the byline markup as shown below.
The page preview should update to show the text centered vertically with the photo.
<!-- Component wrapper -->
<div class="rvt-flex rvt-items-center">
  <!-- Image -->
  <img src="https://rivet.iu.edu/img/placeholder/avatar-1.webp" alt="">
  <!-- Content -->
  <div>
    <h2>Norval Ashton</h2>
    <p>Norval Ashton is a writer and researcher from Bloomington, Indiana. They have won many awards.</p>
    <a>test@iu.edu</a>
  </div>
</div>
6. Add spacing #
Rivet provides spacing utilities that can be used to add margins and padding between page elements.
In this step, you’ll add spacing between the parts of the byline component so that they don’t run up against one another.
Go to the spacing utilities documentation.
6.1. Add space between the photo and the text #
You can add margins between elements using CSS classes that follow the .rvt-m-[direction]-[size] pattern.
For example, if you wanted to add a large margin to the bottom of an element, you would add the .rvt-m-bottom-lg CSS class.
To put some space between the photo and the text in the byline component, add the .rvt-m-right-xl CSS class to the img element as shown below.
The page preview should update to show the added spacing between the photo and the text.
<!-- Component wrapper -->
<div class="rvt-flex rvt-items-center">
  <!-- Image -->
  <img class="rvt-m-right-xl" src="https://rivet.iu.edu/img/placeholder/avatar-1.webp" alt="">
  <!-- Content -->
  <div>
    <h2>Norval Ashton</h2>
    <p>Norval Ashton is a writer and researcher from Bloomington, Indiana. They have won many awards.</p>
    <a>test@iu.edu</a>
  </div>
</div>
6.2. Add padding around component #
You can add padding around elements using CSS classes that follow the .rvt-p-[direction]-[size] pattern.
For example, if you wanted to add a small amount of padding around each side of an element, you would add the .rvt-p-all-sm CSS class.
To add an extra large amount of padding around the entire byline component, add the .rvt-p-all-xl CSS class to the component wrapper div element as shown below.
The page preview should update to show the added spacing around the entire byline component.
<!-- Component wrapper -->
<div class="rvt-flex rvt-items-center rvt-p-all-xl">
  <!-- Image -->
  <img class="rvt-m-right-xl" src="https://rivet.iu.edu/img/placeholder/avatar-1.webp" alt="">
  <!-- Content -->
  <div>
    <h2>Norval Ashton</h2>
    <p>Norval Ashton is a writer and researcher from Bloomington, Indiana. They have won many awards.</p>
    <a>test@iu.edu</a>
  </div>
</div>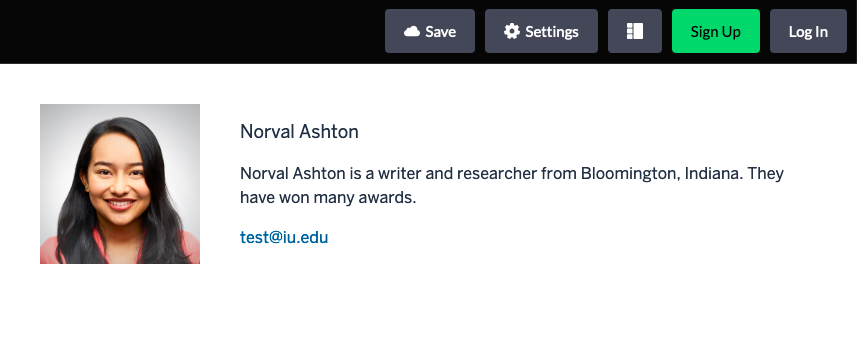
7. Adjust typography #
Rivet provides typography utilities you can use to adjust an element’s text styles.
In this step, you’ll update the appearance of the byline text to create more visual contrast between the name and the biography.
Go to the typography utilities.
7.1. Add prose styling to the text #
You can use the .rvt-prose typography utility class to add automatic styling to an element containing running text.
To style the byline component’s text, add the .rvt-prose CSS class to the div element wrapping the name, bio, and email elements as shown below.
The page preview should update to show the new text styles.
<!-- Component wrapper -->
<div class="rvt-flex rvt-items-center rvt-p-all-xl">
  <!-- Image -->
  <img class="rvt-m-right-xl" src="https://rivet.iu.edu/img/placeholder/avatar-1.webp" alt="">
  <!-- Content -->
  <div class="rvt-prose">
    <h2>Norval Ashton</h2>
    <p>Norval Ashton is a writer and researcher from Bloomington, Indiana. They have won many awards.</p>
    <a>test@iu.edu</a>
  </div>
</div>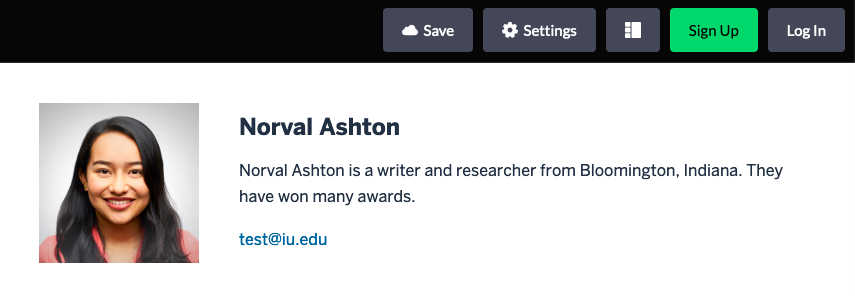
8. Add border and shadow #
Rivet provides border utilities and shadow utilities that can be used to help visually group and highlight elements.
In the next steps, you’ll add a border and subtle drop shadow to the byline component.
8.1. Add rounded border #
Go to the border utilities documentation.
You can use the .rvt-border-all CSS class to add a border on each side of an element. You can combine the .rvt-border-all class with the .rvt-border-radius class to add rounded corners to the border.
Add both the .rvt-border-all and .rvt-border-radius CSS classes to the component wrapper div element as shown below.
The page preview should update to show the border.
<!-- Component wrapper -->
<div class="rvt-flex rvt-items-center rvt-p-all-xl rvt-border-all rvt-border-radius">
  <!-- Image -->
  <img class="rvt-m-right-xl" src="https://rivet.iu.edu/img/placeholder/avatar-1.webp" alt="">
  <!-- Content -->
  <div class="rvt-prose">
    <h2>Norval Ashton</h2>
    <p>Norval Ashton is a writer and researcher from Bloomington, Indiana. They have won many awards.</p>
    <a>test@iu.edu</a>
  </div>
</div>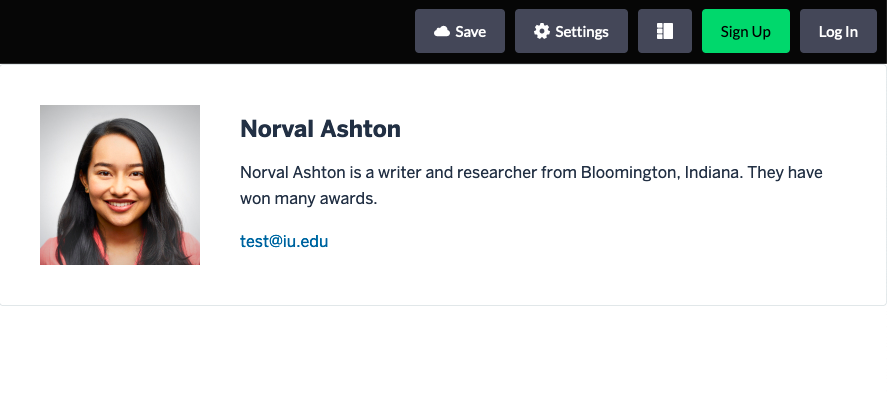
8.2. Add subtle drop shadow #
Go to the shadow utilities documentation.
You can use the .rvt-shadow-subtle CSS class to add a subtle drop shadow to an element.
Add the .rvt-shadow-subtle CSS class to the component wrapper div element as shown below.
The page preview should update to show the drop shadow.
<!-- Component wrapper -->
<div class="rvt-flex rvt-items-center rvt-p-all-xl rvt-border-all rvt-border-radius rvt-shadow-subtle">
  <!-- Image -->
  <img class="rvt-m-right-xl" src="https://rivet.iu.edu/img/placeholder/avatar-1.webp" alt="">
  <!-- Content -->
  <div class="rvt-prose">
    <h2>Norval Ashton</h2>
    <p>Norval Ashton is a writer and researcher from Bloomington, Indiana. They have won many awards.</p>
    <a>test@iu.edu</a>
  </div>
</div>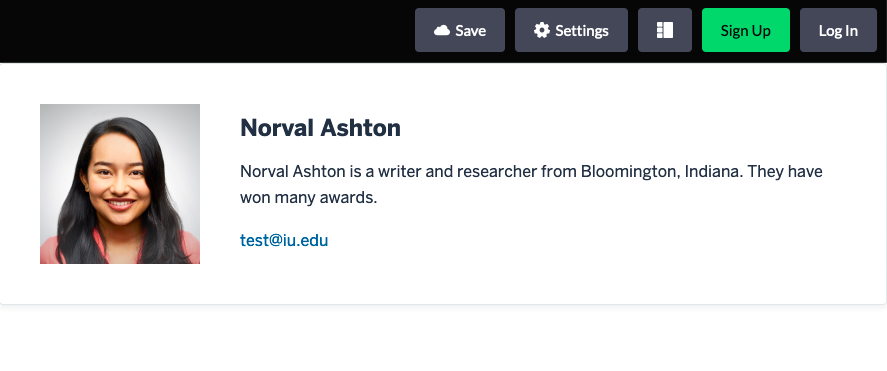
9. Give the photo a rounded appearance #
To complete the byline component, you’ll use the .rvt-border-radius-circle CSS class from the border utilities to give the photo a rounded appearance.
Add the .rvt-border-radius-circle CSS class to the img element as shown below.
The page preview should update to show the rounded image.
<!-- Component wrapper -->
<div class="rvt-flex rvt-items-center rvt-p-all-xl rvt-border-all rvt-border-radius rvt-shadow-subtle">
  <!-- Image -->
  <img class="rvt-m-right-xl rvt-border-radius-circle" src="https://rivet.iu.edu/img/placeholder/avatar-1.webp" alt="">
  <!-- Content -->
  <div class="rvt-prose">
    <h2>Norval Ashton</h2>
    <p>Norval Ashton is a writer and researcher from Bloomington, Indiana. They have won many awards.</p>
    <a>test@iu.edu</a>
  </div>
</div>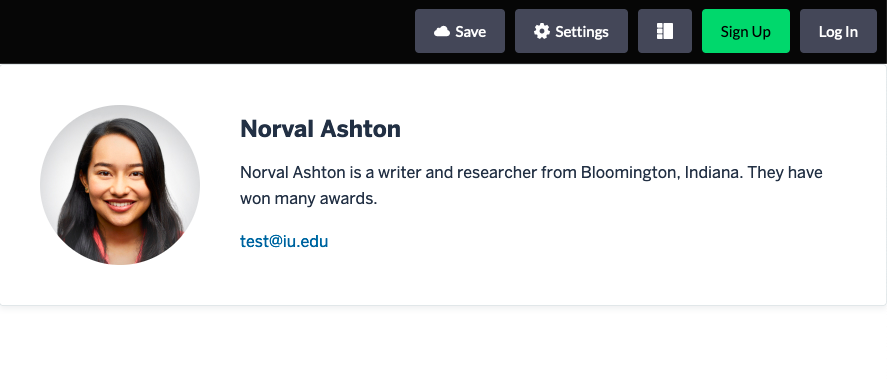
Tutorial complete #
Congratulations—you have just created a component using Rivet utilities! 🎉
You can paste your component markup into any Rivet page to use it.
Some things to try next:
- Try adding your byline component to a blank Rivet layout
- Experiment with adding other utility classes to the byline component markup
- Come up with your own idea for a custom component and create it using utilities
- Learn more about how to extend Rivet